Sunday, April 28, 2013

Single-Serving Mini Breakfast Casseroles

Mini breakfast casseroles
Single-serving mini breakfast casseroles, version 1.0
When I throw a large dinner party, I prefer not to rest on an old standby recipe. My guests are my test subjects. That brings us to today's (slightly delayed) Night of 1000 Casseroles edition of Weekly Delicious with mini breakfast casseroles.

This recipe is scalable, reheatable, and completely flexible. It's easily adapted to be vegetarian or gluten-free as well.

The scalable part of this recipe didn't come easy, since I don't usually cook small. But since I was more or less making this up by scribbling the steps out on a piece of construction paper as I went along, I tried to make as small of a batch here as I could so that if something was amiss, not much was wasted. 

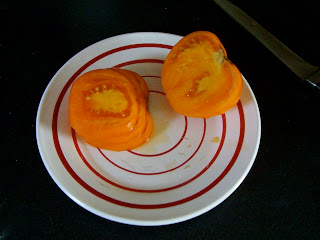
The photo above is from the first trial of these casseroles. Though still tasty, they didn't come out cleanly and a lot of the bottom layer of the casserole came off on the papers. Now, I don't normally advocate support of a certain widely-known domestic personality, but I have to say that "Marthawrap" was pretty much exactly what I needed for this recipe. If you can find something else with the powers of parchment paper on one side and foil on the other, more power to you. Parchment paper is almost a necessity here, and the foil aspect allows it to keep it's shape.

You can still try for high-quality, self-supported, grease-proof cupcake papers, but if you're going the route of parchment paper (magically foiled or not), you'll have a bit more prep ahead of you, but a cleaner casserole. Skip ahead to the ingredients if you're not doing this.

Grab a muffin tin or whatever mold you want your casserole to be in the shape of. Cut your parchment paper/wrap into 5"-6" squares, depending on the size of the mold you're using. There might be some trial and error if you're using a non-standard shape. Press the paper evenly into the mold, making sure creases are tight and you have a rim of uniform height going all the way around so that none of the filling leaks out. Trust me on that one. You can use a glass or something to help with that.

What I did is shown below. I put my square of paper/foil over the muffin tin mold, then pressed down on it with a similarly shaped quarter cup measuring cup, making sure that the creases were tight.

DIY parchment paper cupcake papers
Loose creases are the enemy.
Repeat as needed and start getting everything else you need together.

Ingredients (for 6 casseroles):
  • 3 large eggs
  • 1/3 cup half and half
  • 1/2 heaping cup of frozen hash browns
  • Salt and pepper
  • 1/2 cup of your choice of filling
    • For example, this time I roasted some minced mushrooms, green pepper, leek, and zucchini, then tossed that with some fresh wilted baby spinach and some cooked, chopped bacon. Just what I had on hand. Roasted veggies were made ahead of time by baking them at 425°F for about 15 to 20 minutes... which can also be done at the same time as step #3 below.
  • 1/4 cup cheese (cheddar was used this time)
  • 1/4 cup panko bread crumbs (enough to sprinkle on top of casseroles)
Pre-preparations:
  • Preheat oven to 425°F
  • Lay out all of your casserole papers on a baking sheet
Directions:
  1. Lightly spray the inside of your casserole papers with non-stick spray. Seriously, it's not as good if they stick.
  2. Divide the hash browns evenly amongst the casserole papers, then salt and pepper the hash browns to taste.
  3. Bake the hash brown-filled casserole papers for about 15-20 minutes in the 425°F oven. The edges of the hash browns should just start getting some color by the end of that. Remove and set aside.
  4. Reduce the oven temperature to 350°F.
  5. Evenly distribute the filling into each casserole, on top of the hash browns. On my batch, it came up most of the way to the top of each casserole.
  6. Beat the eggs and half and half together and evenly distribute the mixture into each casserole. It should mostly cover the hash browns and filling.
  7. Top the casseroles with the cheese, again, evenly distributed across every casserole.
  8. Sprinkle on panko bread crumbs on top of the cheese for each casserole. You won't be completely covering the cheese with a layer of bread crumbs; this is just to add a bit of a crunch when they're fresh from the oven.
  9. Bake the casseroles in the 350°F oven for 20-25 minutes, or until the cheese starts to brown.
If your casserole papers were non-stick enough, you should have a great eggy casserole that's lightly browned on the bottom, firm in the middle, and both gooey and crunchy on top. Serve immediately out of the oven or allow them to cool and store them in the fridge for up to a week.

Notes:
  • This recipe is all about ratios, however, as you scale it up, you might be able to cut the number of eggs you use. When I made 42 casseroles, math would tell you I would have needed 21 eggs, but I did just fine with 18. Your milage may vary depending on the size of your eggs.
  • Have fun with the filling. My filling above was great, but change it according to your tastes. Sausage would be pretty good too, or maybe you want to use up some of your leftovers.
  • When reheating these, either remove the outer metal cupcake liner or pop the casseroles out of the paper/wrap before putting them into the microwave.
  • These panko isn't essential to this recipe, so if you want to make it gluten-free, just keep it out. Ditto with meat if you want to make it vegetarian.
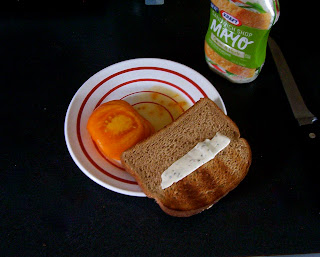
  • These are also a great size for breakfast sandwiches.
When I did my final version for my casserole dinner party, I took advantage of the flexibility of this recipe and made half vegetarian. Then, I made half of the vegetarian ones and half of the ones with bacon gluten-free as well, giving me four similar casseroles in one round of cooking.

Sunday, February 3, 2013

Super-Moist Banana Bread

Finished banana bread. Behold the loaf.
Behold the loaf.
I'm a cook, not a baker. But with how I cook, it's often difficult to remember exactly what I did step by step to recreate it in recipe format here. So, to get back into the swing of posting here (and to use up some bananas starting to go too ripe), banana bread it is.

Not one to leave well enough alone, I combined two recipes. A constant standby for a solid recipe is the Joy of Cooking, and their banana bread recipe (this version is nearly identical to the 1997 book version actually referenced for this recipe). But I've also been hearing great things about the Flour Bakery banana bread recipe, so I averaged out the two into what turned out to be a very successful loaf of banana bread.

If you're playing the comparison game at home, I evened out the amounts of flour and bananas, used two types of leaveners, upped the amount of spices, reduced the sugar, and went with oil and sour cream to work with the bananas to keep the loaf moist. And I kept out the nuts, since this is banana bread, not banana nut bread.

Banana bread ingredients
The banana bread cast.
Ingredients:
  • 1 1/2 cups of all purpose flour
  • 2/3 cup sugar
  • 3/4 tsp salt
  • 1/2 tsp baking soda
  • 1/4 tsp baking powder
  • 3/4 tsp cinnamon
  • 1/4 tsp allspice
  • 3 ripe, mashed bananas (yours should be riper than those in the picture)
  • 2 eggs
  • 1/2 cup vegetable oil
  • 2 T sour cream
  • 1 tsp vanilla extract
Pre-preparations:
  • Preheat oven to 350°F
  • Line a 4"x8" loaf pan with parchment paper for easy extraction. No paper? Grease it with veggie oil.
  • Mash bananas
Directions:
  1. Perform your pre-prep (preheat, line, mash).
  2. In a large bowl, combine the flour, salt, baking soda, baking powder, cinnamon, and allspice
  3. In a smaller bowl, beat the eggs and sugar together until creamy and well-combined.
  4. Beginning with the oil, mix the oil, vanilla extract, sour cream, and bananas into the wet bowl.
  5. Being careful not to overmix, slowly stir in the contents of the wet bowl into the dry bowl and mix until completely combined.
  6. Pour the mixture into the lined loaf pan, and place the pan into the middle rack of your oven.
  7. Bake for approximately 45 minutes to one hour, depending on your oven and your crust crunchiness preference.
That's it. Simple. Done. And the best part about lining the pan is that you can just lift out the loaf cleanly, and not have to wash a loaf pan.

What could you do to this to put your own spin on it? Try this with some toasted walnuts, or some dried cranberries. Add more spices during the holidays to make a more seasonal bread, or play with different combinations of spices (I was this close to making chai banana bread). I'm also well aware that I like my banana bread less sweet than some, so you can also bring the sugar back up to a full cup.

To really test the mettle of this banana bread, I brought it to my dry, dry office. After five days of taking off slices of the bread little by little, I was left with a heel that I left out for science. At the end of about six moisture-sucking hours, I tried the five-day-old heel. While it was nowhere near its original goodness, it was actually still reasonably moist and pretty decent.

Banana bread heel
My poor banana bread. Left out for science.
Please be kinder to your loaf than I was to mine. But realize that if you aren't, your bread will still love you back unconditionally... for about a week.

Friday, January 11, 2013

African Peanut Stew (with Sweet Potatoes)

My love for sweet potatoes is well-known. I think my obsession may be at a point where I'd eat them for every meal if it were nutritionally feasible. I'm becoming notorious in my office for consuming a large roasted sweet potato, split and stuffed with a generous portion of goat cheese, for lunch nearly every day. It's my go-to favorite meal.

It doesn't hurt that in addition to being crazy-delicious, sweet potatoes are chock-full of Vitamins A and C, beta-carotene, and are an excellent source of potassium.

But as they say (or as I say, anyway), there's more than one way to eat a sweet potato. If roasted sweet potatoes with goat cheese are my favorite preparation, my second-favorite is African Peanut Stew. I don't know why, but the sweetness of the sweet potatoes and the creamy, nutty richness of the peanut butter is a winning combination. For extra creaminess and substantially more protein, I also like to add black-eyed peas. In these cold Boston winters, this recipe is comfort in a bowl.

You can serve this as a traditional stew, by itself, or over a bed of your favorite grains. I recommend either Trader Joe's Harvest Blend (with Israeli couscous, red quinoa, and vegetable orzo) or millet.

Query: Does soup taste better out of an extra-pretty bowl that has crows and a moon painted on it? I think it does.

Ingredients
  • 1 t coconut oil or olive oil
  • 1 medium onion, diced
  • 1 T fresh grated ginger
  • 1 to 2 large sweet potatoes, diced (the exact amount is up to you, but always err on the side of more sweet potato)
  • cayenne pepper, to taste
  • 1 T cumin
  • 1 t coriander
  • 1/4 t cinnamon
  • 1/4 t ground cardamom
  • 1/4 t turmeric
  • 1/2 cup dried black-eyed peas, soaked overnight and cooked 1 1/2 hours (or 1 can black-eyed peas)
  • 2 cups chopped green cabbage
  • 1 can petite cut diced tomatoes
  • 1 cup apple juice
  •  1/4 cup natural unsalted peanut butter (almond butter also works beautifully here)
  • chicken or vegetable stock, as needed
  • salt and pepper, to taste

 Instructions

Prepare ahead: Rinse and soak dried black-eyed peas, if using, according to instructions on the bag.

1. Melt the coconut oil (or pour the olive oil) into a large pot over medium heat. Add diced onions and sauté about 5 minutes, stirring frequently.
2. Add the ginger, sweet potatoes, and spices. Sauté for 5 more minutes.
3. Add beans, cabbage, tomatoes, and apple juice. Stir until all ingredients are well incorporated.
4. Add in the peanut butter. Stir thoroughly. If stew seems too thick, add chicken or vegetable stock until you achieve the desired consistency.
5. Cover and let simmer 30 minutes.
6. Add salt and pepper to taste.

Divide into bowls, inhale the sweet-spicy-nutty aroma, and try not to swoon too hard.

Serves 4-5

Tuesday, October 18, 2011

Pumpkin Ricotta Crepes

Sometimes, I have flashes of inspiration. Sometimes, I also have a container of canned pumpkin and a container of ricotta that simultaneously need using up before they expire in my fridge. What to do? Pumpkin-ricotta...something. Pasta? Already done that. Erm. Dessert? Yes. Yes indeedy.

My French-Canadian heritage came to the rescue with the idea for crepes with a sweet pumpkin-ricotta filling. Now we're talking.

There does not seem to be a recipe out there for pumpkin-ricotta crepes, so I made my own. Rest assured, they are scrumptious. I'm a veteran crepe-maker by now. I can whittle down the recipe to a single serving, too, so I don't spend ages making a full batch and getting hungrier as I watch the stovetop. But I'll scale up the measurements a little for those of you who plan on sharing.

Pumpkin-Ricotta Crepes
serves 4-6, depending on how many crepes you can eat

Ingredients for the Crepes:
1/2 cup flour
1/4 teaspoon salt
4 shakes cinnamon
4 shakes cinnamon sugar
1.5 tablespoons butter, melted
1 egg
1/2 cup milk (or more as needed)

Ingredients for the filling:
1/2 cup canned pumpkin
1/2 cup ricotta (I used part-skim)
1 tablespoon powdered sugar
4 shakes cinnamon
Pumpkin butter (optional)

Directions:
To make the crepes, mix the flour, salt, and cinnamon, then add the egg, melted butter, and milk, and stir to combine. Add additional milk if necessary until batter reaches desired consistency. Batter should be thin and even with no lumps.

Heat a nonstick pan on low heat with a little butter, oil, or cooking spray applied in a thin even coat over the surface of the pan. For each crepe, pour a little batter into pan and tilt to coat the bottom of the pan. Flip to cook both sides-- crepe may just start to curl up on the edges when ready to be flipped. As each crepe is ready, remove to a large plate.

Meanwhile, prepare the filling. Mix the pumpkin, ricotta, sugar, and cinnamon together until well-combined. Taste filling, if desired, to adjust sugar or cinnamon as necessary.

When crepes are done, first spread one side of each crepe with pumpkin butter, if desired. Then, place a generous dollop of filling along the center of the crepe. Roll crepe gently, enjoy, and have a fork at the ready to catch up any filling that oozes out onto your plate as you eat.


Thursday, December 2, 2010

Thanksgiving Roundup

We've been too many weeks without delicious. Or at least delicious that we've bothered to document.

So I propose a Thanksgiving round-up of extra-delicious holiday fare!

I'll start with two recipes of mostly-my-own-devising.

I outdid myself this Thanksgiving. Okay, so I've still never made an entire Thanksgiving dinner myself, but I'm getting there. And that turkey would have been less tasty if I hadn't pointed out that herbs and spices are good things to use on it. Herbs, spices, and butter. Lots of butter. (According to my sources, it doesn't actually soak into the flesh that much, so fear not. Though what are you doing being shy about butter on Thanksgiving anyway.)

Delicious number 1:
I love stuffing. My family does not. This was a problem for many years. It was hard enough to talk them into putting stuffing on the table at all, let alone taking the time and effort to make it from anything but Stovetop. (Or Trader Joe's, also made on the stovetop.)

This year I took matters into my own hands. I made cornbread stuffing from scratch. I contemplated using Trader Joe's cornbread mix, which is delicious beyond all reason and frankly better than most from-scratch cornbreads I've had, but I decided from scratch meant from scratch, the whole hog (so to speak).

Also, making your own stuffing means you are free to leave those icky celery bits out. Um. Unless you actually like celery. I sure don't.

I pretty much threw stuff in as suited me. I had the kielbasa and the cornbread, but when I was mixing it together I realized it was basically crumbly cornbread with teeny bits of sausage and onion thrown in, and it didn't yet feel like its own dish. So I chopped up an apple and threw that in at the very last minute.

Results were stupendous. My stuffing-hating family demolished it. My dreams of leftovers were dashed. Next time I'm gonna need a bigger pan.

Michelle's Magical Cornbread Stuffing
serves one if you really love stuffing. If you only moderately love it, serves about 6.
(adapted from...I don't even remember where. Eating Well?)

The first step in making cornbread stuffing is to make the cornbread. Ideally, you want to do this a day in advance.

For the cornbread:
1 1/4 cup stone-ground cornmeal
3/4 cup flour
3 tablespoons sugar
1 teaspoon baking powder
1/2 teaspoon salt
1 1/4 cup buttermilk (or about 1 tablespoon lemon juice or white vinegar plus enough milk to fill a measuring cup to 1 1/4 cups)
2 tablespoons butter, melted
1 large egg
3/4 to 1 cup corn kernels, fresh or frozen

Preheat the oven to 350 degrees F. Grease an 8-inch square pan.

Sift together the flour, cornmeal, sugar, baking powder, and salt.

In a separate bowl, mix the egg, the melted butter, and the buttermilk. Fold in the dry ingredients a little at a time. Add the corn kernels and stir to combine. Do not overmix. Pour batter into the prepared pan and bake 25 to 30 minutes.


For the stuffing:
1 pan prepared cornbread, cubed
6 to 8 oz turkey kielbasa (though chicken and apple sausage would work really well here as well)
2 small onions, finely chopped
1/4 teaspoon salt
Pepper
1/2 teaspoon sage
1/2 teaspoon rosemary
1 2/3 cup chicken broth (more or less as needed)
1 apple, diced (skin on is fine)

Grease a 9 x 13 baking pan. Preheat the oven to 325 degrees F.

Slice the kielbasa or sausage and brown in a skillet together with the onion. You don't need to add oil here. The fat from the sausage is enough. Cook until onion is soft and golden, about 10 minutes. Transfer to a bowl and add the salt, pepper, and herbs. Add in the cornbread and apple and toss. Pour 1 cup of broth over the mixture, and add additional broth as necessary until mixture is sufficiently moistened.

Cover pan with foil and bake 25 minutes. Hide the pan from your friends and loved ones and eat it by yourself.


Delicious number 2:
Next up: mashed sweet potatoes! Mashed sweet potatoes have totally taken over regular mashed potatoes in our house. I have some regrets about this, much as I love sweet potatoes. Sometimes, you just need regular potatoes. I don't understand what we're supposed to do with all that gravy without delicious starchy buttery potatoes to pour it over. Still, mashed sweet potatoes are a food of the gods.

I looked everywhere for a good recipe for mashed sweet potatoes, but none of the recipes I saw seemed right. They all called for butter and cream or milk, and lots of sugar. This seems ridiculous to me. Sweet potatoes are indeed sweet. Sweet enough on their own, and heavenly enough without the need to add butter. And yet I didn't quite want to serve them plain. Maybe a smidge of sweetener, not a lot, something that would add a special flavor. Like...maple syrup? Yes please. But not much else. I wanted the sweet-potatoeyness to shine through.

So I made up my own damn recipe.

Michelle's Maple Mashed Sweet Potatoes
serves very few, if you like sweet potatoes...but we'll say 6
6 medium sweet potatoes, scrubbed
1/4 cup maple syrup (approximately)
1/4 cup milk (approximately)
1/2 teaspoon cinnamon

Preheat oven to 400 degrees F.

Prick sweet potatoes with a fork and roast in the oven for about an hour, until tender.

Peel the skins (they should come right off, but try not to burn your fingers. Or be sensible and let them cool first). Toss flesh into a pot and mash. Add the maple syrup and milk, but don't go overboard. You want just a hint of maple here, and just enough milk to help thin the mixture out and give it a good consistency. Add the cinnamon. Maybe a pinch of salt, too, if you're feeling adventurous.

Serve. If you have the willpower, save some and make sweet potato biscuits with the leftovers. (Make biscuits, but only use 2 tablespoons of butter and sub the rest for 3/4 cup mashed sweet potato. Bake.)


Tuesday, August 31, 2010

The Perfect Fresh Tomato Sandwich


I always crave tomatoes when late August and early September rolls around. That's when the tomatoes in my mom's garden are at their peak. Every year, for as long as I can remember, her tomato vines take over our fence in the summer in a riot of exuberant green tendrils. The tomatoes line up on our kitchen counter, one by one, in ever-increasing numbers until it seems impossible that one family of four could ever finish them all.

Unless they love tomatoes as much as my mom does.

That yearly tomato crop has made a life-long tomato snob out of me, I'm afraid. I don't like to eat tomatoes out of season, and I hardly ever reach for them at the store. Before I even knew the meaning of "fresh," "local," or "in season," I knew the taste of a grocery store tomato never compared to what we had at home in August. The pinkish, almost dry store-bought tomatoes fell so far short they were hardly worth touching.

My mom seems to love tomatoes, plain, fresh, and whole, more than any other food. I've seen her eat them raw like an apple, sitting at the counter with a tomato in one hand and a shaker of salt in the other. Sure, you can use fresh tomatoes for your sauces, your pasta dishes, your chicken shawarmas, but in my opinion, the freshest tomatoes are best enjoyed simply, uncooked, and with minimal additions.

Even in salads or on top of burgers I've had a life-long habit of picking the tomato out and enjoying it separately, unmarred by the intrusion of too many other flavors.

My absolute favorite use for fresh tomatoes-- and a dish I only ever seem to crave this time of year-- is a tomato sandwich. This is how my family has always gotten through our bounty of tomatoes.

I've described this sandwich to all my friends and acquaintances, and everyone seems perplexed by it, as if this tradition barely exists outside our family. I know we aren't the only ones to make tomato sandwiches this way, but this wonderful minimalist recipe ought to be better-known.

My mouth has been watering for a fresh tomato sandwich all month. Now, as we know, I'm a big fan of getting my food as discounted as possible. But that isn't the way to go for this sandwich. Now that I don't live at home and have no tomato plants of my own, I headed to the farmer's market for a pound of fresh, ripe heirloom tomatoes. I suggest you do the same.

All this sandwich takes is one juicy tomato, fresh from your garden or the local farmer's market, neatly sliced with a sharp knife...


Then add 2 slices of toasted bread, and a little mayonnaise. (Trust me on the mayonnaise. I'm an avowed mayo-hater, and this is one of my two exceptions.)


You'll probably want three or four tomato slices per sandwich, depending on the size of your bread slices and how thickly you sliced the tomatoes. I recommend not trying to cut this in half or you'll have tomatoes falling out all over the place. Eat immediately, and lap up any stray juices and seeds from the plate when you're done.

For extra deliciousness, eat the rest of the tomato slices too. A sliced tomato doesn't keep long, so you might as well.

Fresh Tomato Sandwiches

Ingredients
2 slices hearty whole-wheat bread
1 tomato, fresh from your garden or the local farmer's market, sliced lengthwise
1 tbsp mayonnaise

Directions
1. Toast the bread in a toaster or toaster oven. Lightly toasted is best. You want it to be just a little bit crisp, but retaining a little flexibility for easier chewing.
2. Slice the tomato lengthwise. Try to slice evenly.
3. When bread is toasted, spread the mayonnaise over once slice of bread. Get a thick, even coat. You might want to use a little more mayonnaise than you think you need. It's there to absorb some of your tomato juices and turn the sandwich into a delicious pink mess of...um...deliciousness.
4. Lay the tomato slices on top of the mayonnaise layer, and top with the remaining slice of bread.

Thursday, August 19, 2010

Boozy Sauteed Chicken

Roommates, roommates, roommates. Can't live with them, can't live...well, you could live without them, but you might not be able to pay your share of the rent anymore. Drat.

I love my roommates, as it happens-- all four of them, five if we count the kitten-- but once in a while I could wish for my own kitchen. My plans to make a delicious boozy chicken, perhaps with a side of the daringly high-fat French-Canadian classic, poutine, were halted last night by one of my will-remain-nameless-roommates' sporadic cook-fests that produces wild amounts of food and a porportionate amount of mess. The kitchen was a war zone, strew with abandoned eggplant slices, bell pepper cores, onion skins, and encrusted pans, colanders, knives...oh, and beer cans. There wasn't a scrap of counter space left for me.

Feelings were mended by said roommate offering me a scoop of pasta and a slice of feta and sundried tomato flatbread that was as big as my head. But damn, was I still itching to make that chicken.

And even though the kitchen is still a war zone, with one small length of counter cleared in the interval, I made my chicken tonight anyway. And it was delicious. And I even cleaned up after myself when I was done.

This chicken is incredibly easy to make and infinitely adaptable. Chicken and a few glugs of dry white wine are all you need to produce tender, savory meat that will leave you licking your fingers for every last scrap of sauce.


Boozy Sauteed Chicken
recipe adapted from food loves writing

picture of delicious tasty boozy sauteed chicken recipe


Serves one, but easy to scale up.

Ingredients:
1/2 chicken breast, flattened a little or cut into tenders
1 clove garlic, minced
a few glugs dry white wine, such as Sauvignon Blanc
salt and pepper to taste
1 tsp olive oil

Directions:
Heat the olive oil in a small nonstick skillet. When hot, add in the chicken and garlic. Cook chicken on medium heat, 2-3 minutes, until browned on both sides.

Add just enough wine to cover the bottom of the pan. Chicken will sizzle beautifully. Add salt and pepper and mix into wine-sauce.

Continue cooking and turning chicken to cook on all sides, about 8-10 minutes. Press down on chicken gently to ensure even cooking. Check thoroughly for pinkness while cooking. Add more wine as necessary, scraping up any burned bits from the bottom of the pan. The chicken will brown and the smell of the wine will waft upwards to tantalize you while you stir.

When chicken is cooked all the way through, remove from heat and serve with a side of vegetables and perhaps a slice or two of baguette. Not to mention the rest of that wine.