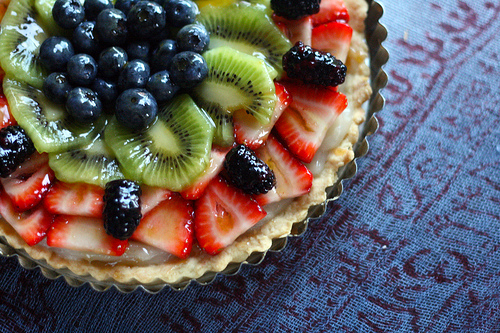
As is often the case, I volunteered to provide dessert for a social occasion without actually knowing what I’d make. Or if I had the necessary ingredients. Or even the time. This tart is the result of an hour of frantic online recipe browsing, leafing through cookbooks, and running around Harris Teeter like a madwoman, and another hour of stirring, accidentally powdering all nearby surfaces with confectioners’ sugar, slicing fruit quickly rather than safely, and pouring hot jam. But it’s worth it for all the envious looks you’ll receive from your roommate, passers-by on the street, and even the normally surly DC bus driver who isn’t supposed to let you on with open dishes of food but makes an exception because it looks so scrumptious. Most of this recipe is taken from Colleen Patrick-Goudreau’s The Joy of Vegan Baking.
Last Minute Vegan Fruit Tart
SHORTBREAD CRUST:
- 1/2 cup (112g) non-hydrogenated, nondairy butter, at room temperature
- 1/4 cup (25g) confectioners’ sugar
- 1 cup (125g) all-purpose flour
- 4 tbsp ice water
Preheat the oven to 350°F (180°C). Lightly grease the pie pan with canola oil or nondairy butter. I used this 9″ tart pan, but any similarly sized pie dish or square casserole dish will do. Use tartlet pans or even a muffin pan if you want to make cute little tartlets.
In a medium-sized bowl, cream the butter and confectioners’ sugar until light and fluffy. (If you have an electric mixer, use it. If not, a spoon, employed vigorously for several minutes, is also sufficient. My mixture was creamy–rather than fluffy–and still turned out fine.)
Add the flour a third at a time and beat until the dough just comes together. If your dough, like mine, doesn’t just “come together”, stir in ice water one tablespoon at a time until the dough begins to form a loose ball. It’s okay if it’s still a little crumbly.
Press the mixture into the bottom of your prepared pan and bake for about 20 minutes, or until lightly browned. Bake time will vary depending on your oven. Mine took about 35 minutes, so start out with 20 and check every 5-10 minutes after that. Remove from the oven and place somewhere to cool.
–
PASTRY CREAM (CUSTARD):
- 1/3 cup (65g) granulated sugar
- 2 tbsp (16g) all-purpose flour
- 4 tbsp (32g) cornstarch
- 1/4 cup (60mL) water
- 1 1/3 cups (315mL) nondairy milk (I used rice milk, but soy milk is obviously fine, too)
- 2 tsp vanilla or lemon extract (I used vanilla)
In a medium-sized bowl, beat together the sugar, flour, cornstarch, and water on high speed until creamy, about 2 minutes. (Again, I just used a fork for about 4 minutes, adding the ingredients one at a time.) Set aside.
In a saucepan, bring the milk to a simmer. Pour about 1/3 cup (80mL) of the hot milk into the sugar mixture and stir to thoroughly combine. This doesn’t have to be precise; just make sure the sugar mixture is a little liquid-y. Pour this sugar-milk mixture back into the saucepan with the rest of the milk. Return to the stove and heat over medium-low heat, whisking constantly. This is important! Don’t stop whisking for anything, not even zombies or kittens! It will begin to thicken immediately. (They’re not kidding. It only takes about a minute or two, if that, for the cream to thicken sufficiently.)
Scrape the bottom and sides of the pan as you whisk. Cook until it begins to bubble, then whisk as vigorously as you can for 30 seconds, and remove from heat. (Mine never bubbled. If yours doesn’t either, just remove from heat when it seems about as thick as your average chocolate pudding.) Stir in the vanilla/lemon extract.
If your pie crust is baked and ready, go ahead and pour the cream into the crust, smoothing it flat with a rubber spatula or large spoon. It doesn’t have to be perfect, since the fruit will be covering it anyway. If your crust isn’t ready yet, you can store the pastry cream (covered) in the fridge for up to 3 days.
–
TOPPING:
- 3-4 tbsp (80g) jelly, jam or preserves (I used apricot jam. Peach is also good.)
- 2 1/2 cups fruit, sliced (I used about 1 1/2 cups of strawberries, 1 kiwi, 7 blackberries, and a handful of blueberries)
Arrange your sliced fruit on top of the tart. Even if you’re the worst pastry decorator in the history of the world, there’s no way this will look anything but delicious.
Heat the jelly in a small saucepan, whisking constantly. Once it’s hot, strain into a small bowl, mug, or measuring cup, leaving behind seeds or anything else solid. It should be liquid enough to pour. If it’s too thick, just reheat with a little water added.
Using a pastry brush (or a small spoon, in a pinch), brush the heated jelly over the top of the fruit. Everything should be covered with a thickish layer, but not overwhelmed. It should look moist, shiny, and wonderful. NOTE: it may be difficult to stop yourself from devouring the tart right then and there. (Another argument for tartlets.)
Serves 8, supposedly. It served three of us, with about 1/6 left over.
For an equally delicious, non-vegan version of this recipe, simply use real butter and milk.Cross-posted at www.serenae.com.


