Monday, August 16, 2010

Last-Minute Vegan Fruit Tart

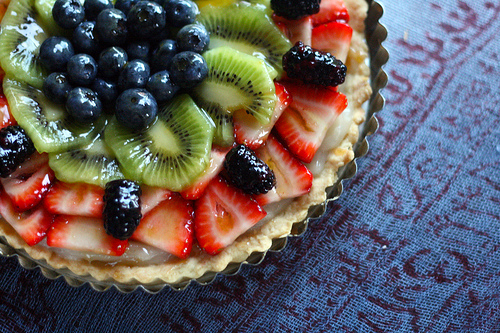
Ever wandered, drooling, past a bakery window and wished that you could have a tart of your very own? A tart to cherish, to love, to pile high with freshly sliced fruit? Well, now you can!

As is often the case, I volunteered to provide dessert for a social occasion without actually knowing what I’d make. Or if I had the necessary ingredients. Or even the time. This tart is the result of an hour of frantic online recipe browsing, leafing through cookbooks, and running around Harris Teeter like a madwoman, and another hour of stirring, accidentally powdering all nearby surfaces with confectioners’ sugar, slicing fruit quickly rather than safely, and pouring hot jam. But it’s worth it for all the envious looks you’ll receive from your roommate, passers-by on the street, and even the normally surly DC bus driver who isn’t supposed to let you on with open dishes of food but makes an exception because it looks so scrumptious. Most of this recipe is taken from Colleen Patrick-Goudreau’s The Joy of Vegan Baking.

Last Minute Vegan Fruit Tart

SHORTBREAD CRUST:

  • 1/2 cup (112g) non-hydrogenated, nondairy butter, at room temperature
  • 1/4 cup (25g) confectioners’ sugar
  • 1 cup (125g) all-purpose flour
  • 4 tbsp ice water

Preheat the oven to 350°F (180°C). Lightly grease the pie pan with canola oil or nondairy butter. I used this 9″ tart pan, but any similarly sized pie dish or square casserole dish will do. Use tartlet pans or even a muffin pan if you want to make cute little tartlets.

In a medium-sized bowl, cream the butter and confectioners’ sugar until light and fluffy. (If you have an electric mixer, use it. If not, a spoon, employed vigorously for several minutes, is also sufficient. My mixture was creamy–rather than fluffy–and still turned out fine.)

Add the flour a third at a time and beat until the dough just comes together. If your dough, like mine, doesn’t just “come together”, stir in ice water one tablespoon at a time until the dough begins to form a loose ball. It’s okay if it’s still a little crumbly.

Press the mixture into the bottom of your prepared pan and bake for about 20 minutes, or until lightly browned. Bake time will vary depending on your oven. Mine took about 35 minutes, so start out with 20 and check every 5-10 minutes after that. Remove from the oven and place somewhere to cool.

–

PASTRY CREAM (CUSTARD):

  • 1/3 cup (65g) granulated sugar
  • 2 tbsp (16g) all-purpose flour
  • 4 tbsp (32g) cornstarch
  • 1/4 cup (60mL) water
  • 1 1/3 cups (315mL) nondairy milk (I used rice milk, but soy milk is obviously fine, too)
  • 2 tsp vanilla or lemon extract (I used vanilla)

In a medium-sized bowl, beat together the sugar, flour, cornstarch, and water on high speed until creamy, about 2 minutes. (Again, I just used a fork for about 4 minutes, adding the ingredients one at a time.) Set aside.

In a saucepan, bring the milk to a simmer. Pour about 1/3 cup (80mL) of the hot milk into the sugar mixture and stir to thoroughly combine. This doesn’t have to be precise; just make sure the sugar mixture is a little liquid-y. Pour this sugar-milk mixture back into the saucepan with the rest of the milk. Return to the stove and heat over medium-low heat, whisking constantly. This is important! Don’t stop whisking for anything, not even zombies or kittens! It will begin to thicken immediately. (They’re not kidding. It only takes about a minute or two, if that, for the cream to thicken sufficiently.)

Scrape the bottom and sides of the pan as you whisk. Cook until it begins to bubble, then whisk as vigorously as you can for 30 seconds, and remove from heat. (Mine never bubbled. If yours doesn’t either, just remove from heat when it seems about as thick as your average chocolate pudding.) Stir in the vanilla/lemon extract.

If your pie crust is baked and ready, go ahead and pour the cream into the crust, smoothing it flat with a rubber spatula or large spoon. It doesn’t have to be perfect, since the fruit will be covering it anyway. If your crust isn’t ready yet, you can store the pastry cream (covered) in the fridge for up to 3 days.

–

TOPPING:

  • 3-4 tbsp (80g) jelly, jam or preserves (I used apricot jam. Peach is also good.)
  • 2 1/2 cups fruit, sliced (I used about 1 1/2 cups of strawberries, 1 kiwi, 7 blackberries, and a handful of blueberries)

Arrange your sliced fruit on top of the tart. Even if you’re the worst pastry decorator in the history of the world, there’s no way this will look anything but delicious.

Heat the jelly in a small saucepan, whisking constantly. Once it’s hot, strain into a small bowl, mug, or measuring cup, leaving behind seeds or anything else solid. It should be liquid enough to pour. If it’s too thick, just reheat with a little water added.

Using a pastry brush (or a small spoon, in a pinch), brush the heated jelly over the top of the fruit. Everything should be covered with a thickish layer, but not overwhelmed. It should look moist, shiny, and wonderful. NOTE: it may be difficult to stop yourself from devouring the tart right then and there. (Another argument for tartlets.)

Serves 8, supposedly. It served three of us, with about 1/6 left over.

For an equally delicious, non-vegan version of this recipe, simply use real butter and milk.

Cross-posted at www.serenae.com.

Tuesday, August 10, 2010

Farmer's Market Cantaloupe Sorbet

At the beginning of last week, I found myself with half of a delicious cantaloupe. Now, that may not seem like much of a problem to you. Eating cantaloupe is a pretty enjoyable activity, after all. But it just so happens that there's one thing even better than than fresh cantaloupe on a sweltering summer day: icy cantaloupe sorbet!

When I scoured the internet for recipes, my limitations became immediately apparent. No ice cream maker, no corn syrup, not even an electric OR hand mixer. I mixed and matched, mostly following this recipe. So here it is,

Nearly-Unaided-by-Newfangled-Machinery Farmer's Market Cantaloupe Sorbet


INGREDIENTS:
  • 1/4 cup water
  • 1/4 cup sugar
  • 1/2 cantaloupe, in 1-1.5 inch pieces (watermelon or honeydew can be easily substituted)
  • 1-2 tbsp lemon or lime juice
Combine sugar and water in medium saucepan. Stir over medium heat until sugar dissolves. Bring to boil. Transfer to a deepish (at least 2 inches) casserole dish and chill until cold, about 2 hours. (I used a tupperware container with a lid and stuck it in the freezer for a half hour.)

MEANWHILE, puree cantaloupe in blender until smooth. This takes about 10 seconds, then another 10 to make sure it's actually smooth and get over your disbelief that yes, it really was that easy. Stir in the lemon/lime juice. (I squeezed half a lemon into the mixture, but you may want to add more if your cantaloupe is especially sweet. I also read a few recipes that called for a splash of vodka or gin, for texture rather than flavor.)

Pour into the sugar syrup in dish/container and stir until well blended. Freeze until almost firm, stirring every half hour or so, at least 3 hours or overnight (if you freeze it overnight, it will become a SOLID frozen block and will need to set it out on the counter to soften again).

Transfer cantaloupe mixture to large bowl. Using electric mixer a fork, beat until fluffy. If you go with the fork method it's going to be a little lumpy, so don't FREAK OUT. Get it as fluffy as you can, but don't worry if it's not perfect. This sorbet is delicious in any shape. Return to freezer and freeze until firm (do not stir), at least 3 hours or overnight. Cover and keep frozen. Again, if you've used a fork rather than an electric mixer, you'll want to give it a chance to thaw a little before serving, unless you enjoy chipping away at rock-hard sorbet.

Serves 6 / 1 ravenous person with a sweet tooth / 1 normal person for a week / a gaggle of sticky-faced children

Cross-posted at www.serenae.com.

Sunday, June 6, 2010

Sanity Preserving Roasted Garbanzo Beans


I can sometimes get myself in over my head when I think, "Oh, I can do that, no problem!" Sometimes I even have a healthy amount of doubt, outweighed by an unhealthy amount of optimism and think, "It'll be a good experience!"

For my food writing class, we were given a choice for our last assignment. We could either do a formal research paper, or we could undertake a serious food challenge. Since I didn't want to do anything stupid like eat a mountain of pancakes or suffer through scotch bonnet fritters, I went for altering my diet for a week. The biggest change I could think of for someone like me who can go accidentally vegetarian for days or live off of carbs indefinitely would be to take up Phase 1 of the South Beach Diet. Just a week so I could write about it, nothing more.

Well, I was right. I could do it, and it was a good experience. It reminded me that I had some bad dietary habits and helped me break them. But it also reminded me that if I'm not completely satisfied at meals, I need to snack between them unless I wanted to drive myself crazy. I'm not too much of a raw veggie person, so I finally got to try out a recipe I'd been wanting to try for roasted garbanzo beans.

Trust me, if you're picking up Phase 1, or even just trying to snack healthier, you'll be thankful for these sanity preserving roasted garbanzo beans.

Ingredients:
  • 1 can of garbanzo beans (chickpeas)
  • 2 Tbsp olive oil (approximately)
  • 1/8 tsp cayenne pepper
  • 1/8 tsp garlic powder
  • 1/8 tsp cinnamon
  • 1/8 tsp ground ginger
  • 1/4 to 1/2 tsp kosher salt (to taste)
Procedure:

1. Preheat your oven to 350°F. Line a baking sheet (preferably with a rim) with parchment paper or aluminum foil for easy cleanup.

2. Drain and rinse the garbanzo beans. Use a salad spinner or pat dry with paper towels to ensure the beans are completely dry.

3. In a medium sized bowl, add the beans, oil, and all spices except the salt. Toss together. Don't be afraid to use your hands, a little olive oil is good for them anyway.

4. Spread in a single layer on the covered baking sheet. Sprinkle with the salt to taste, more if you like a salty snack, less if you're not a fan.

5. Bake for approximately 50 minutes. Your oven and bean-doneness-preferences may vary. I like mine slightly dried and crispy on the outside, but still with some moisture on the inside.

That's it. There's no excuse to go hungry on a diet when a snack like this is so easy to make. I know it helped me last as long as I did so I could get my story.

Hint: Vary the spice blend. Like spicier? Make a purely pepper blend. Italian snacks in mind? Try an Italian blend and top it with some tasty parmesan cheese (low fat if you're Phase 1ing it). Really, the flavors you can use on these are only limited by your spice cabinet.

Hint: Double the recipe if you're satisfied with your spice blend. No use waiting around for your next snack fix when you can just as easily make twice as much.

Hint: These can (and at least a few should be) eaten fresh out of the oven, at room temperature, or even cold. I kept some on the counter and some in the fridge, both in air tight containers. Keep them in the containers when not fresh out of the oven or being eaten, otherwise they'll go kind of soft. Still tasty, just soft.

Hint: Put these on things. I was eating a ton of salad that week and was thankful for the kick of flavor these provided in my lunch. But these go amazingly in just about anything regular garbanzo beans go in, whether you're on a diet or not.

Sunday, May 30, 2010

Boyfriend-worthy First Date Chocolate Cake


When a fellow Weekly Delicious blogger posted a Girlfriend Cake, I thought to myself, what about those of us who don't care for girlfriends? Think of the boyfriends, won't somebody please think of the boyfriends?!

This is a chocolate cake with a history. A few months ago, when trying to woo my boy just after his birthday and on our first date, I made a cake. You may be thinking, "Who the hell brings a cake to a first date?" Well, that's just me. As it turned out, it was damn lucky I brought a cake, since we were confined to a cafe for several hours due to the Snowmageddon and got to munch on it for a while.

Unconventional? Yes. But this cake has a 100% success rate for securing a boyfriend, and has been refined over repeated batches, so don't argue with it.

Ingredients:

For the cake:
  • 4 ounces of unsweetened baker's chocolate
  • 1/2 cup water
  • 1 and 3/4 cups flour
  • 1 tsp salt
  • 1 tsp baking soda
  • 1/2 cup unsalted butter (warmed to room temperature) cut into pieces
  • 2/3 cup milk (whole is best)
  • 3 large eggs
  • 1 and 3/4 cups sugar
  • 1 chocolate pudding cup
  • 1 tsp vanilla extract
For the frosting:
  • 1 and 1/2 cups heavy whipping cream
  • 1/3 cup of light corn syrup
  • 1/4 cup unsalted butter
  • About 1 pound dark chocolate (your favorite chocolate will work just fine too, and chocolate chips are very easy)
Procedure:

1. Preheat oven to 350°F. Butter two, 9 inch cake pans and line the bottom with parchment paper. Lightly dust the parchment paper and sides of the pan with flour. Easy tip: Obey Alton Brown for easily cutting a piece of parchment paper for your pan.

2. In a double boiler (i.e. glass bowl on top of a pot filled with water over heat), melt the unsweetened chocolate with the water and stir until smooth. Remove from heat and stir periodically while you do the other steps.

3. In a medium sized bowl, mix together the flour, baking soda, and salt.

4. Mix in the butter a few pieces at a time. If you have an electric mixer, now would be the time to use it. Next best thing I've used has been a pastry cutter. You can get away with a spoon or a rubber scraper it you're thorough enough, or a whisk if it's sturdy enough.

5. Gradually introduce the sugar. Once that's in, add eggs one at a time, followed by the vanilla, then the chocolate mixture you had in the double boiler.

6. Mix in 1/3 of the flour, followed by half of the milk. Mix completely. Then another 1/3 of the flour, followed by the second half of the milk as well as the pudding cup. Mix completely again, then add in the remaining flour and, you guessed it, mix completely once more.

7. Divide the cake batter between the two cake pans and place in the oven. Bake for approximately 35 minutes, or until the cakes begin to pull away from the sides of the pan and a toothpick comes out clean.

8. Let cakes cool for at least 10 minutes. Gently cut the risen dome of one of the cakes to make sure you have a level surface to place the second cake on. By "cut," I actually mean saw off with a serrated knife, otherwise you'll squish or crumble the cake. If you don't want crumbs in your frosting, you can try and gently turn the cake upside-down and gently let the crumbs fall out. GENTLY. Continue to let the cakes cool.

9. In a small pot, combine the butter, cream, and corn syrup and whisk together over medium heat until the contents come to a light simmer.

10. Add in the chocolate and stir together until smooth.

11. Shift the mixture to a large, shallow bowl. Place in the freezer for 15 minutes, then whisk. Back in the freezer for 15 minutes and whisk again. Fifteen more minutes in the freezer and whisk again. Each time the frosting should get lighter and thicker (such as the texture of frosting should be). Depending on how cold your freezer was or how warm the mixture when you first put it in, you may need another freezer/whisk cycle.

12. Take about 1/3 of the frosting and spread over the top of the cake you leveled, making an even layer on the inside. Top with the other cake, then frost the outside evenly.

If nothing else, you'll never go back to store-bought frosting again. And if this cake is a complete success, you'll have a very successful first date.

Monday, May 24, 2010

Girlfriend-worthy Birthday Cake with Strawberries and Cream

What better time to showcase your culinary abilities than an extra-special occasion like a loved one's birthday?

This past month I celebrated my girlfriend's birthday with her for the very first time. Obviously, this was my chance to show off. But I was nervous. I'm a perfectionist when it comes to these things. Everything had to be just right. The girlfriend is a rather fantastic cook herself (her strawberry shortcakes with fresh whipped cream played a key role in the winning of my affections). And she had requested something vague yet specific: a cake that was dense, rather than light and airy, and one that would have whipped cream and strawberries on top.

No problem, I told her, and went off to Google any number of variations on "dense cake recipe," followed by browsing all my favorite food blogs for trusted cake recipes, followed by browsing articles on food science to determine what made cakes dense so I could ensure I got the proper result.

It was a tricky process. Most cakes garnished with cream and fruit were very light and very airy, like angel food cake, or close to it. Chocolate cake recipes were often dense, but definitely not what she had asked for.

Finally I found the one. The recipe fit the requirements but also intrigued me: it called for no butter or shortening at all, yet it promised to produce a moist and tender and cakey cake. The secret is in the heavy cream: the fat of the cream replaces the fat of the butter that most cakes rely on for texture and flavor.

This cake came out exactly right. It was everything I had hoped for and more-- and the ingredients and instructions were refreshingly straightforward.

The cream in the cake also makes it an ideal base for topping with whipped cream and strawberries. The girlfriend and I slathered the whipped cream all over it to beautiful effect, and we savored the moist, rich results (no pictures were taken before we devoured it).

Girlfriend-worthy Cream Cake

via Food Loves Writing

Ingredients:
2 eggs
1 cup sugar
1 2/3 cups all-purpose flour
2 1/2 teaspoons baking powder
3/4 teaspoon salt
1 cup heavy cream
1 teaspoon vanilla extract

Directions:
Preheat oven to 350 F. Butter and flour two 8-inch round cake pans.

In a large bowl, beat eggs until thick and bright yellow; then add sugar and vanilla and mix to combine.

In a separate bowl, sift together the dry ingredients. Beat alternately with the cream into the egg mixture, a little at a time. Batter will be very thick.

Spread batter into the two cake pans. Bake in preheated oven for 25 to 30 minutes until a toothpick inserted in the center comes out clean.

Loosen cakes by running a spatula or butter knife around the edges of the pans, tap the pans sharply once, and let cool.

Whipped cream and strawberries:
3 cups whipped cream
1 tsp almond extract (optional)
2 T white sugar
strawberries, or other berries or fruit, sliced, at room temperature

Do not make the whipped cream until just before the cakes are done and cooled completely. Otherwise, your whipped cream will turn right back into cream. (Stick the cakes in the fridge for a while if you're impatient or short on time.) While the cakes are baking, put a metal mixing bowl in the fridge or freezer to chill it. The cream will whip faster that way.

Set out some strawberries (or other berries if you so desire) so they'll be at room temperature and more flavorful. Biting into cold strawberries is less fun for everyone.

When ready to make the whipped cream, pour heavy cream (we used a pint and a half, or 3 cups, but we like whipped cream in copious amounts) and extract into the pre-chilled bowl and beat with electric mixer. (Whipping cream by hand is possible, but not advisable unless you really like taking half an hour to make it.) When cream thickens, add some white sugar (2 to 3 tablespoons) and continue to beat at high speed until thick and whippy. (You'll know.) Take the cakes, invert them, and frost/assemble the layers, arranging the strawberries on top of the whipped cream.

(I've seen complicated instructions on how to trim layer cakes so they have a straight edge, but here you really don't need to bother. The whipped cream will fill out any uneven parts very nicely.)

Tuesday, April 13, 2010

Campus-Friendly Charoset (Alchohol Removed)


I'm not Jewish. Not in the least. So, what's a boy like me doing, making charoset?

I may not be Jewish, but I've been compared to a Jewish mother, fixing enough food to feed three families and trying to make sure everyone eats. For my film club, we were screening The Secrets (Ha-Sodot), so in order to have an appropriate snack, I decided to prepare some traditional Jewish food. As if I planned it this way, the movie fell during the week of Passover, so I figured something from the seder meal would be best. Lo and behold, charoset made the list.

But, problem! I can't serve anything with alcohol in it to an on campus club. So, this recipe calls for an alcohol-removed solution that ends up tasting fantastic. I don't even really like either apples or walnuts and I couldn't get enough of this.

NOTE: This may or may not be strictly kosher. I wasn't up to buying a Jewish wine, but I do end up boiling it. Depending on which set of rules are used, boiling the wine may make it acceptable, it may not be enough. When in doubt, alter the recipe to suit your needs.

Ingredients:
  • 5 Fuji, Gala, or similarly tasting apples
  • 1 1/4 cups of finely chopped walnut pieces
  • 2 cups of port wine (or your choice of more kosher wines)
  • 2 teaspoons cinnamon
  • 5 teaspoons sugar
  • Optional: lemon or lime juice
Procedure:

1. Put your wine in a small pot and bring up to a boil, letting it reduce by half (about 1 cup remaining).

2. Peel your apples. To keep them from browning, place the peeled apples in a bowl of water containing about a teaspoon of lemon or lime juice.

3.a. If you are working with a mandolin slicer: With a sharp knife, slice bands about a quarter of an inch thick all around the apple, not cutting all the way to the core. You should be making the cuts perpendicular to the core, so that it looks like a stack of apple slices held together by the core that you didn't cut through. With that done to all the apples, attach your thinnest julienning attachment onto the mandolin, and adjust the blade height to about a millimeter thick. Slice through all your apples, avoiding the core. Run a large chef's knife through the apple piles if you desire a finer cut. Remember to return each batch of cut apples to the lemon/lime water to keep them from browning up.

3.b. If you are working with a food processor: Core your apples and slice them to the size appropriate to fit in your machine. Pulse the apples until they resemble a minced texture, but don't make them into apple sauce.

3.c. If you don't have any fancy kitchen equipment: Find a friend. Block the door. Tell them they're helping you mince apples. Wait for them to stop trying to run away, then prepare to buckle down and mince all the apples as small as you can manage. About 1 millimeter all around should be small enough.

4. Pat down the cut apples with a paper towel to remove excess moisture. If you have a salad spinner, that'll also work.

5. Combine cut apples, walnuts, reduced wine, cinnamon, and sugar, adjusting the sugar and spice as you see fit.

And there you have it. Great by itself, on matzo, or on your choice of non-Passover foods. This recipe is actually surprisingly easy to do for such a delicious outcome. Well, I have a mandolin slicer, so if you're slicing by hand you might not agree with me on the "easy" part, but it's hard not to consider this tasty.

Side effect: Any space you cook or serve this in while it's still fresh will smell amazing.

Tuesday, April 6, 2010

Brown Sugar Carrot-Zucchini Bread

A fellow member of The Weekly Delicious, the wonderful Anna, shared a recipe with me recently that I had to try. It came from here at Food People Want originally, but merits its own post here due to my seeming inability to follow any recipe without making modifications. Hey, I have my preferences, and my spare ingredients that need using up.

The original recipe was for a carrot bread (okay, essentially carrot cake in a loaf pan without the frosting) with a little fresh ginger, lots of brown sugar, and orange zest. Mmm, tasty. But I didn't have quite enough carrots on hand, and I had some zucchini that needed using up, so I shredded in about half a medium zucchini along with the two carrots I had in the fridge. And I left out the white sugar, because I just won't use white if I can get away with using brown instead. And I subbed in some whole wheat flour because my mom does that for her fabulous-beyond-all-reason carrot cake, so I figured it couldn't hurt. And last, I used half applesauce, half oil instead of oil alone because I had just about a fourth of a cup of applesauce left in my fridge, and I was starting to worry I wouldn't use the rest before it went bad.

The recipe was a definite success. I brought it to my girlfriend's house hoping to impress her with my culinary prowess, and I think I did. We sliced it up for breakfast and it was lovely. We were especially impressed by how well it held together.

Make sure to include the orange zest, by the way. I could really taste it in each bite and it was...well, zesty.


Brown Sugar Carrot-Zucchini Bread
INGREDIENTS:

* 1 cup unbleached all-purpose flour
* 1/2 cup whole-wheat flour
* 1 teaspoon cinnamon
* 3/4 teaspoons baking powder
* 3/4 teaspoons baking soda
* 1/2 teaspoon ground cardamom
* 1/4 teaspoon salt
* 2 large eggs
* 3/4 cups packed brown sugar
* 1/4 cup canola oil
* 1/4 cup applesauce, unsweetened
* 1/2 teaspoon pure vanilla extract
* 1/2 teaspoon grated fresh ginger (I used bottled minced ginger)
* Grated zest of 1/2 orange
* 1 heaping cup shredded carrots and/or zucchini (this was two medium carrots and half a zucchini for me)

METHOD:

1. Preheat the oven to 350°. Coat one 8 by 4" loaf pan with cooking spray or oil.
2. In a medium bowl, combine the flour, cinnamon, baking powder, baking soda, cardamom and salt.
3. In a large bowl, beat the eggs with the brown sugar . Add the oil SLOWLY in a thin stream, beating constantly, until the batter has doubled in volume and oil is well-incorporated. Beat in the applesauce, vanilla, orange zest and ginger. Fold in the shredded carrots and zucchini. Beat in the dry ingredients in 3 batches, mixing well between additions.
4. Pour the batter into the prepared pan. Bake in the middle of the oven for 50 minutes to 1 hour, or until a toothpick inserted into the center comes out clean.

Makes 1 8 by 4" loaf